Interior Waterproofing vs. Exterior Weeping Tile Replacement: The Honest Breakdown
Few home maintenance emergencies strike greater fear into an Ontario homeowner’s heart than discovering pools of standing water along the basement perimeter after a sudden spring snowmelt or a torrential autumn downpour. Across Southern Ontario, the Greater Toronto Area, the Golden Horseshoe, and eastern regions like Ottawa, homes are built on soils heavily dominated by dense, low-permeability clay. Combined with intense seasonal temperature swings, ranging from scorching summer humidity to sub-zero winter deep freezes, our subterranean environments create significant hydrologic forces against residential foundations.
When moisture breaches your home’s lower level, taking immediate action is critical. Water infiltration does not simply ruin personal belongings and foster toxic black mold spores (Stachybotrys chartarum); it actively threatens the underlying structural integrity of your entire residence.
Once you begin inviting licensed foundation repair contractors into your home for assessments, you will encounter two competing philosophies: exterior weeping tile replacement (stopping the water outside) or an interior waterproofing system (managing the water inside). Both engineering approaches claim to offer lifetime protection against basement flooding, yet they function on entirely different mechanical principles, require vastly different installation workflows, carry unique price points, and present drastically different secondary disruption risks.
The Big Debate: Managing Water From Inside vs. Stopping It Outside
To determine which method suits your property, you must first understand the central debate governing modern building envelope design: Is it better to block water before it ever contacts the foundation wall, or is it better to relieve the water’s pressure and redirect it once it reaches the footing?
To answer this, we must examine the subterranean force responsible for virtually all basement water intrusion: hydrostatic pressure.
Hydrostatic Pressure Relief
Soil is not a static solid; it acts like a giant sponge. When heavy rain falls or accumulated snowpack melts quickly, the ground surrounding your foundation becomes saturated. In areas with dense clay soil, water cannot drain rapidly downward into deep aquifers. Instead, the soil expands, trapping water directly against your below-grade foundation walls.
As the column of water in the surrounding soil rises, it exerts lateral and vertical forces known as hydrostatic pressure. Liquid weighs approximately 62.4 pounds per cubic foot. When hundreds of cubic feet of soil surrounding your basement fill with water, thousands of pounds of continuous force press inward against your concrete walls and upward against your basement floor slab.
Water is an opportunist. Under hydrostatic pressure, it seeks out any path of least resistance. It forces its way through:
- Microscopic pores and capillary channels within poured concrete.
- Thermal expansion cracks and structural settling fractures.
- Holes left behind by steel tie-rods used during original concrete form construction.
- The cold joint (also called the cove joint), which is the seam where your poured concrete basement floor slab meets the top of the concrete footing and lower wall.
Exterior waterproofing addresses hydrostatic pressure by eliminating the water column altogether. By excavating the saturated soil surrounding the house and placing free-draining stone and perforated piping at the bottom, water drops straight down away from the structure before it can build up force against the concrete.
Interior waterproofing, conversely, operates as a controlled hydrostatic pressure-relief network. It recognizes that fighting groundwater on the outside face of an older or tightly bounded foundation can be exceptionally difficult or cost-prohibitive. Instead of attempting to seal the outside face, an internal drainage system provides a subterranean escape path inside the home. Water that penetrates the wall or rises under the slab flows harmlessly through drilled weep holes and channels into an under-slab pipe network, which routes it directly to a mechanical sump pump before pressure can build up enough to flood your living space.
Understanding Exterior Weeping Tile Replacement (The Traditional Standard)
Exterior foundation waterproofing is traditionally considered by structural engineers and municipal building inspectors as the ultimate baseline for foundation protection. By placing the physical barrier on the exterior face, the concrete wall assembly itself remains completely dry, isolated from the destructive cycle of saturated freeze-thaw erosion during long Canadian winters.
The Process: Deep Excavation, Membranes, and Footing Tiles
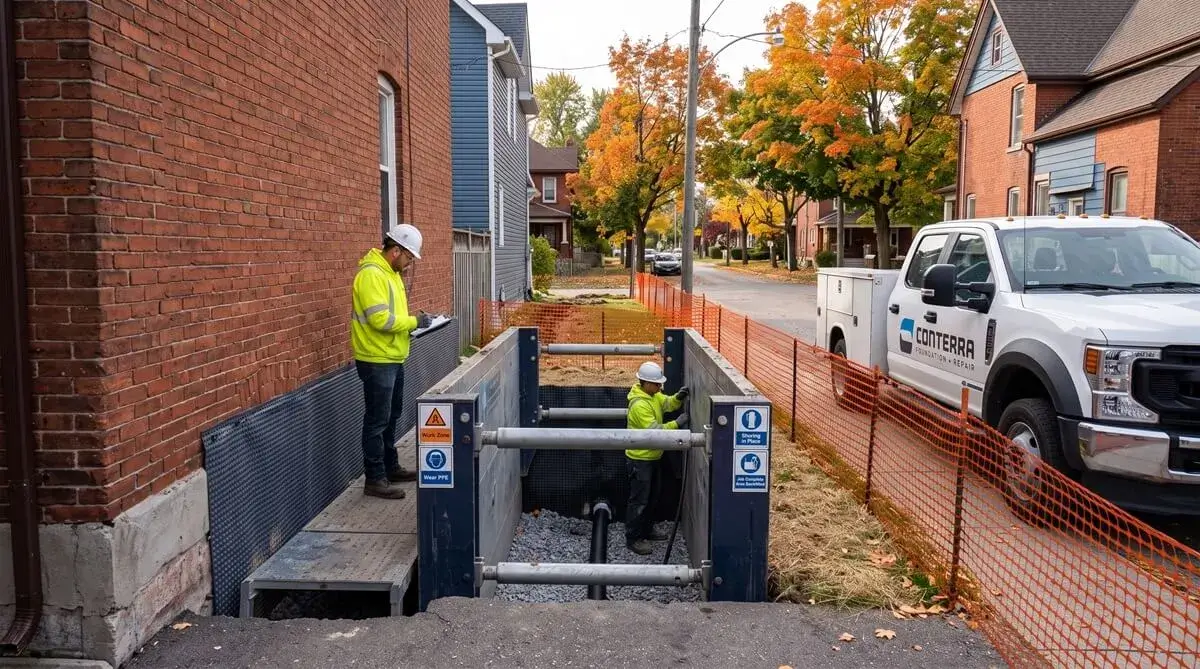
Replacing an exterior weeping tile network is a major civil construction project around your home. A professional installation follows a strict sequence:
- Utility Markouts & Site Setup: Contractors contact Ontario One Call to locate gas, electric, telecommunication, and water lines. Equipment, safety shoring, and protective plywood sheets are staged.
- Deep Excavation: Using compact or full-sized heavy excavators, crews dig a trench along the entire target perimeter of the home down to the top of the concrete footings—typically 6 to 9 feet deep. The excavated soil is banked back on the property or hauled offsite.
- Substrate Preparation & Washing: The exposed concrete or block wall is thoroughly washed with high-pressure water to strip away decaying original damp-proofing tar, dirt, and loose material.
- Structural Masonry Repair: Cracks, spalling concrete, and deteriorated mortar joints are chiseled out, filled with non-shrink hydraulic cement, and smoothed flush.
- Membrane Application: A thick elastomeric asphalt coating is applied to seal surface pores. Next, contractors mechanically fasten a heavy-duty dimpled high-density polyethylene (HDPE) air-gap drainage membrane (such as Delta-MS) to the wall. The dimples create a permanent air gap between the membrane and the concrete, forcing any moisture that slips past the outer shield to drop straight to the bottom by gravity.
- Weeping Tile Replacement: Workers remove old, crushed, or silt-clogged clay or weeping tiles. They lay brand-new perforated PVC or corrugated weeping tile wrapped in a synthetic geotextile filter-sock directly alongside the concrete footing, pitched toward a gravity outlet or internal sump connection.
- Clear Stone & Soil Backfill: The drainage pipe is buried under 18 to 24 inches of 3/4-inch washed clear crushed gravel. This gravel bed ensures fast water flow and prevents soil particles from clogging the pipe. Finally, the native soil is backfilled, compacted in lifts, and graded with a positive slope falling away from the house structure.
Pros and Cons of Exterior Excavation
Pros:
- Complete Concrete Protection: Keeps moisture away from the physical masonry, extending the total foundation structural lifespan by eliminating freeze-thaw concrete degradation.
- Preserves Living Space: All construction takes place outside the home, meaning living areas, finished basements, and mechanical rooms remain completely untouched indoors.
- Passive Drainage Options: If your property grade permits, exterior weeping tiles can sometimes drain via gravity to a low point on the lot or a municipal storm connection, reducing reliance on electric pumps.
Cons:
- Major Outdoor Destruction: Landscaping, stone patios, asphalt driveways, gardens, custom decks, and air conditioning equipment situated near the foundation must be torn out or dismantled.
- High Labour & Material Overhead: Deep excavation requires specialized machinery, skilled operators, extensive safety precautions, and long labour hours.
- Weather Constraints: Excavating wet, frozen clay during deep Ontario winters or during intense spring rainy seasons is difficult, dangerous, and sometimes impossible.
Understanding Interior Waterproofing (The Hydrostatic Drainage System)
When exterior excavation is physically impractical—such as in narrow urban lots, semi-detached homes, or properties with massive hardscaping investments—an internal drainage system offers a fully code-compliant, highly reliable solution.
The Process: Sump Pits, Interior Weeping Tiles, and Dimpled Wall Shields
An interior waterproofing system manages groundwater beneath the basement floor slab before it ever migrates onto your finished flooring. The installation process includes:
- Perimeter Demolition: Workers use electric jackhammers to remove a 12-to-18-inch channel of the concrete floor slab along the interior side of the exterior walls.
- Sub-Slab Trenching: A trench is excavated alongside the interior edge of the concrete footing, and native soil is removed to make room for drainage stone and piping.
- Weep Hole Drilling: For hollow concrete block or cinder block foundations, technicians drill small drainage holes into the hollow cavities of the bottom course of blocks. This releases any water trapped inside the block walls directly into the new drainage trench.
- Membrane Installation: A heavy-duty, dimpled HDPE drainage membrane is fastened to the interior wall surface (either partial height or full wall height down from the grade line) and tucked directly into the sub-slab trench.
- Perimeter Piping & Clear Stone: A perforated interior weeping tile pipe is laid inside the trench and surrounded by clear crushed gravel to allow fast water conveyance.
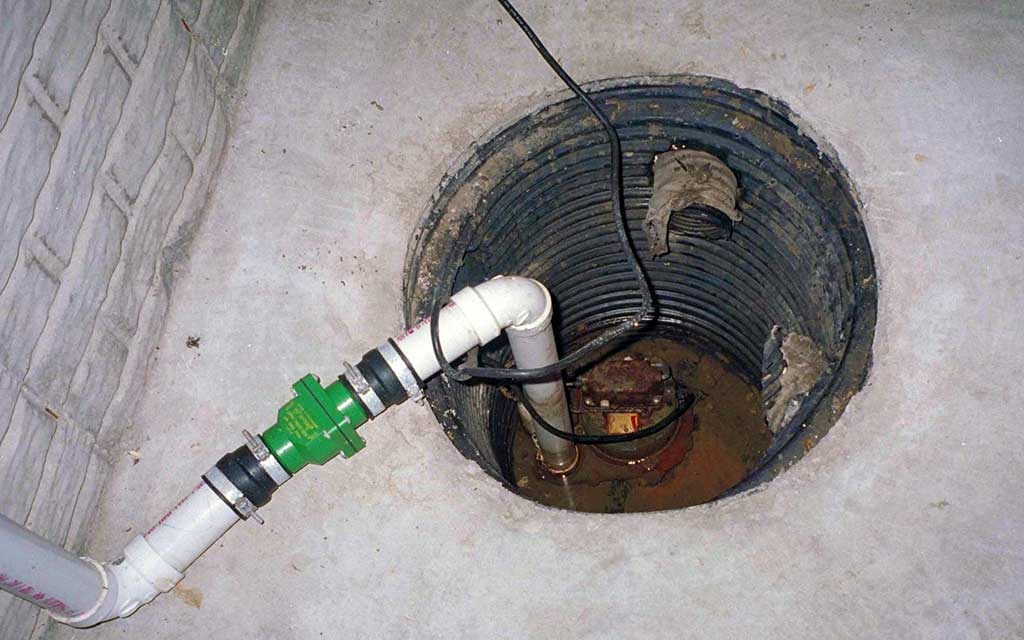
- Sump System Setup: The drainage pipes are connected directly into a heavy-duty polyethylene sump basin buried below the floor slab level. A high-capacity submersible sump pump with a check valve and discharge pipe is installed.
- Concrete Restoration: Fresh concrete is poured flush with the existing floor slab over the trench, leaving a smooth floor surface ready for new subflooring or floor coverings.
Pros and Cons of Internal Management
Pros:
- 100% Year-Round Installation: Because all work occurs inside a climate-controlled home, interior waterproofing can be installed in the dead of winter or during torrential downpours.
- Zero Outdoor Disruption: Protects expensive outdoor hardscaping, interlock stone driveways, mature gardens, and wooden decks.
- Highly Cost-Effective: Requires significantly fewer labour hours and no heavy excavation equipment, resulting in lower upfront costs.
- Direct Slab Pressure Relief: Highly effective at eliminating water that bubbles up through floor slab stress cracks or expansion joints.
Cons:
- Demolition of Finished Spaces: Under finished basement constraints, contractors must remove the bottom 2 to 3 feet of drywall, framing studs, insulation, and flooring along exterior walls.
- Total Power Dependency: The system relies entirely on electricity and mechanical sump pumps to remove water from the home. If power cuts out during a severe storm, the system fails unless equipped with a reliable battery backup.
- Concrete Remains Wet: Ground moisture still makes contact with the exterior face of the concrete wall, even though hydrostatic pressure is successfully relieved before water pools on the floor.
Cost vs. Disruption: Landscaping Impact vs. Tearing Down Finished Drywall
Choosing between these two methods requires balancing upfront mechanical invoices against secondary restoration expenses. Homeowners must compare the direct weeping tile cost per foot with the hidden costs of repairing either outdoor landscaping or interior basement finishes.
Cost and Disruption Factors
1. Weeping Tile Cost Per Foot (Direct Construction Costs)
- Exterior Waterproofing: Typically ranges from $150 to $250+ CAD per linear foot in Ontario. For a standard detached home with a 140-linear-foot perimeter, direct installation costs range between $21,000 and $35,000 CAD.
- Interior Waterproofing: Typically ranges from $70 to $150 CAD per linear foot. For that same 140-linear-foot perimeter, direct installation costs range between $9,800 and $21,000 CAD.
2. Sump Pump Equipment Requirements
An interior system requires a dedicated sump pit and pump setup. A primary cast-iron submersible pump, heavy-duty basin, check valve, and dedicated electrical circuit add approximately $1,200 to $2,500 CAD. Adding an emergency battery backup pump system—essential during Ontario ice storms and summer grid failures—adds another $800 to $1,800 CAD.
3. Outdoor Landscaping Impact vs. Indoor Demolition
- The Outdoor Equation: If your exterior perimeter features a custom $25,000 interlock stone patio, an attached cedar deck, and mature privacy trees, an exterior excavation project will destroy those features. Rebuilding outdoor structures can easily add $5,000 to $20,000 CAD on top of the waterproofing invoice.
- The Indoor Equation: If your basement contains a fully finished living space with custom drywall, built-in cabinetry, and hardwood subflooring, installing an interior membrane requires stripping back the lower wall sections. Remediating and re-finishing interior framing, insulation, vapor barriers, drywall, trim, and paint can cost anywhere from $4,000 to $12,000 CAD. However, if your basement is currently unfinished or used solely for utility storage, interior waterproofing carries virtually zero secondary repair costs.
Contact Conterra Foundation Today
Because every residential property presents a unique combination of structural age, soil chemistry, lot lines, and interior finishes, there is no single universal winner. The correct choice depends on your specific foundation construction:
Contact Conterra Foundation today to ensure you are making the best choices for your property and its foundation.
Sources:
- https://free.bcpublications.ca/civix/document/id/public/bcbc2012/ep001029.13?
- https://www.cmhc-schl.gc.ca/en/buying/-/media/22610DC70C644141ABA132333F2E029F.ashx